MCP Servers: Giving Your AI Coding Agent Real Tools
How to extend your AI coding assistant with Model Context Protocol servers — connecting it to your database, APIs, and custom tools in about ten minutes.

When you describe a bug to an AI coding assistant and it asks “what does the database row look like?”, you have two options: copy-paste the relevant record into the chat, or give the assistant a tool that lets it query the database directly. The second option sounds harder. With Model Context Protocol (MCP), it’s about ten minutes of setup.
MCP is a standardized protocol for connecting AI assistants to external tools and data sources. It defines a client-server model: your AI coding tool (the client) connects to one or more MCP servers, each of which exposes a set of callable tools. The assistant can invoke those tools mid-conversation — querying a database, fetching a URL, reading a git diff — without you copying output back and forth.
How the protocol works
From the model’s perspective, MCP tools work like this:
- The server advertises its tools — each with a name, description, and JSON Schema for inputs
- The model decides to call a tool and sends the parameters
- The server executes the call and returns text or structured content
- The model incorporates the result into its next response
The transport layer is typically stdio: the AI client spawns the MCP server as a subprocess and communicates over stdin/stdout. Some clients also support HTTP/SSE for remote servers.
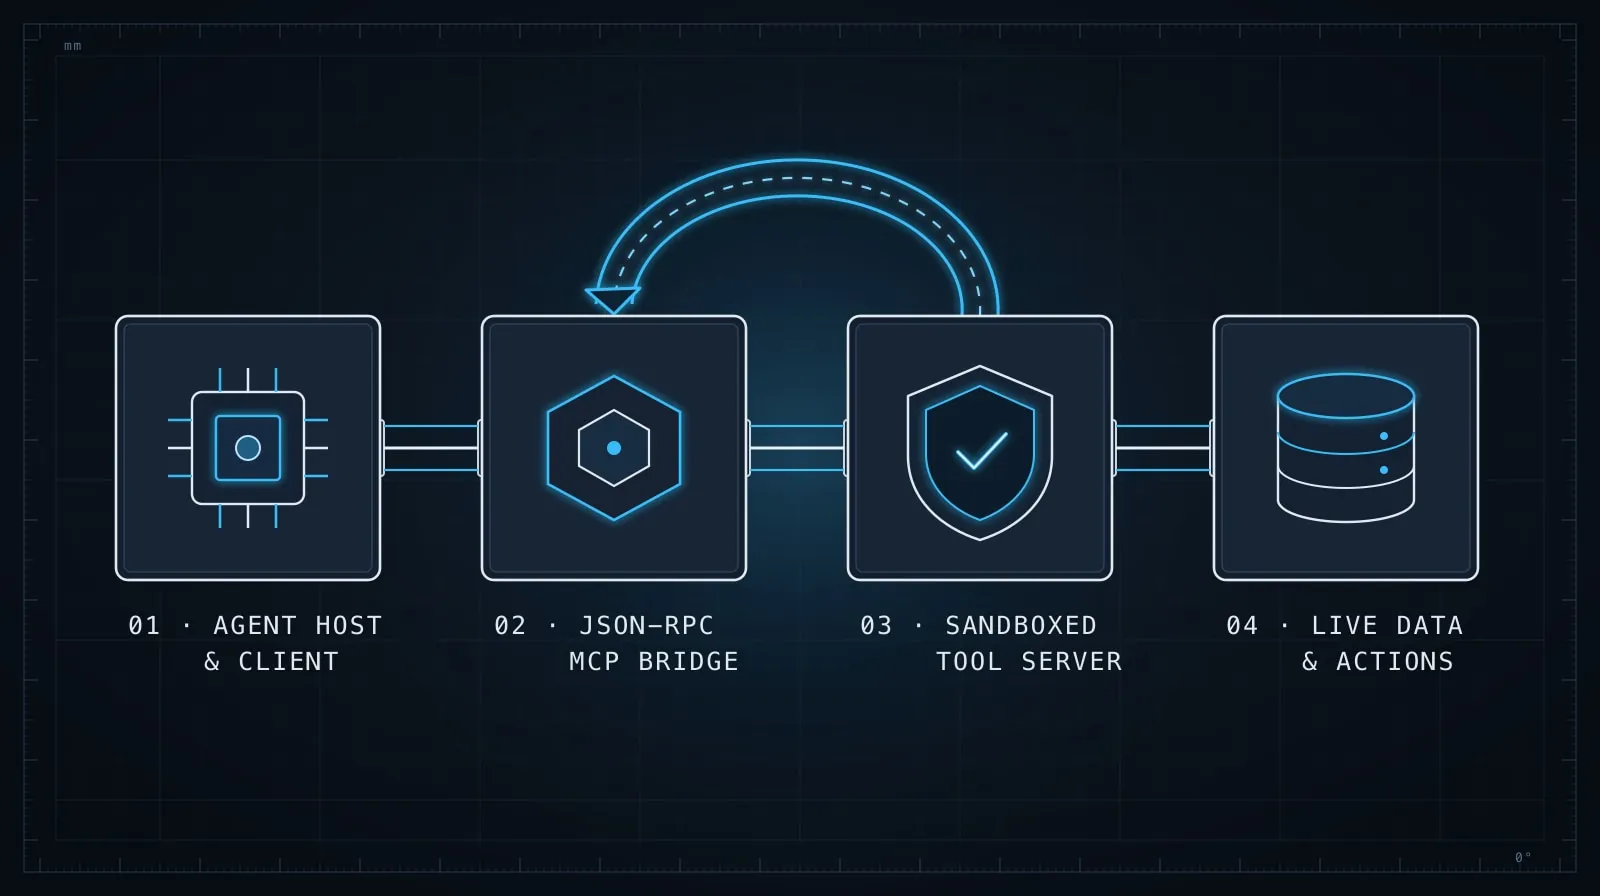
The crucial insight is that the model sees tool definitions as part of its context window. Clear names and descriptions determine whether the model reaches for the right tool or ignores it entirely. A tool named query_database with the description “Run a read-only SQL SELECT against the production Postgres database” is unambiguous. One named db_op with no description will be misused or skipped.
Five pre-built servers worth installing today
Most teams can capture significant value without writing any server code. The MCP ecosystem ships mature implementations for common needs.
@modelcontextprotocol/server-postgres — Connects to a Postgres database. The assistant can inspect the schema, read table definitions, and run SELECT statements. Results come back as readable text, so the model can reason directly about your actual data.
@modelcontextprotocol/server-filesystem — Read/write access to a scoped directory tree. List files, read contents, write outputs. Configure it with your project root, not your home directory.
@modelcontextprotocol/server-github — Read access to GitHub: search code, read files at specific commits, list pull requests, read issues. Useful when the context of a change lives in a PR description, not just a file.
@modelcontextprotocol/server-fetch — Fetches arbitrary URLs and returns the content. Lets the assistant pull current documentation or check an API response without you copying it in manually.
mcp-server-git — Exposes git operations: log, diff, blame, show. The assistant can look at commit history directly rather than having you paste diffs.
To wire these up in Claude Code, add them to .claude/mcp.json in your project root:
{
  "mcpServers": {
    "postgres": {
      "command": "npx",
      "args": [
        "-y",
        "@modelcontextprotocol/server-postgres",
        "postgresql://localhost/mydb"
      ]
    },
    "filesystem": {
      "command": "npx",
      "args": [
        "-y",
        "@modelcontextprotocol/server-filesystem",
        "/home/user/myproject"
      ]
    }
  }
}
The assistant picks up these servers on the next session start. You can confirm they connected by asking the assistant to list its available tools.
Building a minimal custom server
When pre-built servers don’t cover your use case, the SDK makes writing a custom server straightforward. Here’s a complete working server that exposes one tool — fetching deployment status from an internal API:
import { Server } from "@modelcontextprotocol/sdk/server/index.js";
import { StdioServerTransport } from "@modelcontextprotocol/sdk/server/stdio.js";
import {
  ListToolsRequestSchema,
  CallToolRequestSchema,
} from "@modelcontextprotocol/sdk/types.js";

const server = new Server(
  { name: "deploy-status", version: "1.0.0" },
  { capabilities: { tools: {} } }
);

server.setRequestHandler(ListToolsRequestSchema, async () => ({
  tools: [
    {
      name: "get_deploy_status",
      description:
        "Returns the current deployment status for a given service. " +
        "Use this when debugging a production issue to check if a recent " +
        "deploy is the cause before looking at the code.",
      inputSchema: {
        type: "object",
        properties: {
          service: {
            type: "string",
            description: "Service name, e.g. 'api' or 'web'",
          },
        },
        required: ["service"],
      },
    },
  ],
}));

server.setRequestHandler(CallToolRequestSchema, async (request) => {
  if (request.params.name !== "get_deploy_status") {
    throw new Error(`Unknown tool: ${request.params.name}`);
  }
  const { service } = request.params.arguments as { service: string };
  const response = await fetch(`https://internal.example.com/deploy/${service}`);
  const data = await response.json();
  return {
    content: [{ type: "text", text: JSON.stringify(data, null, 2) }],
  };
});

const transport = new StdioServerTransport();
await server.connect(transport);
Register it in .claude/mcp.json:
{
  "mcpServers": {
    "deploy-status": {
      "command": "node",
      "args": ["/path/to/deploy-status-server.js"]
    }
  }
}
That’s the whole pattern. One ListTools handler, one CallTool handler, a stdio transport. The model will call get_deploy_status naturally during debugging sessions when it needs to correlate a symptom with a recent deployment — exactly when you’d otherwise open a separate dashboard and paste the result in.
Write tool descriptions for the model, not for humans
The single most important thing to get right is the tool description. Two rules that make a real difference:
Say when to use it, not just what it does. “Run a SQL query against the database” is adequate. “Run a SQL query against the production database — use this when you need to inspect actual row data, verify what’s in the schema before generating a migration, or check the result of a recent write operation” is much more useful. The model uses the description to decide when the tool is appropriate.
Say what the tool returns. “Returns a JSON object with deployedAt, commit, and healthy fields” tells the model how to interpret the result and incorporate it into its reasoning. Without this, the model may not know whether the response is a status string, a record count, or a structured object.
A model that understands your tools will reach for them at the right moment. A model with vague tool descriptions will either ignore them or call them when it shouldn’t.
Security boundaries to set upfront
MCP servers execute with whatever access you give them. A few constraints worth establishing before you start:
Read-only database connections. A SELECT-only Postgres role covers the vast majority of debugging use cases. Don’t give the assistant a write connection unless a specific task requires it — and if you do, scope it narrowly with row-level security or schema restrictions.
Scoped filesystem access. server-filesystem configured with ~ gives the assistant access to your SSH keys, credential files, and anything else in your home directory. Configure it with the project directory only.
Staging, not production. For internal API servers you write yourself, point them at a staging environment by default. Production reads are sometimes necessary; production writes during a coding session almost never are.
These aren’t restrictions that limit what you can do — they’re constraints that make it safe to let the assistant act more autonomously. The smaller the blast radius of any single tool call, the more freely you can let the model explore.
A mistake I nearly shipped — Josh: When I first set up the filesystem server I pointed it at my home directory, because that path was already in my clipboard. It worked fine — and it also meant the assistant could read my SSH keys and every
.envfile I owned. Nothing bad came of it, but seeing the actual blast radius made me go back and rescope every server config to the project directory and a read-only database role. These boundaries aren’t paranoia; they’re the thing that let me relax and give the assistant more room.
When MCP changes the workflow
The concrete improvement is eliminating the copy-paste loop. Without MCP: debugging starts, assistant asks what’s in the database, you open a separate client, run the query, paste the result. With MCP: the assistant queries the database as part of its own reasoning, already knowing the actual state.
The more significant shift is that the assistant can form and test hypotheses without waiting on you. If it suspects the bug is related to a recent deploy, it checks the deploy log. If it thinks the schema has drifted from the model layer, it inspects the actual table definition. This is the same principle covered in Debugging with LLMs: Give the Model What It Can’t Guess — the more runtime context the model has access to, the narrower and more accurate its hypotheses.
The trade-off is setup time. MCP servers are processes that need to start, handle errors, and stay up while you work. For a one-off debugging session, pasting context manually is often faster than wiring up a new server. For recurring workflows — daily development against the same database, regular use of the same internal APIs — the setup cost pays for itself quickly.
Getting started
Install the SDK and pick one pre-built server to start:
npm install @modelcontextprotocol/sdk
npx -y @modelcontextprotocol/server-postgres postgresql://localhost/mydb
Try the Postgres server first if you have a local database. Ask the assistant to describe a table’s schema, then ask it to check a specific row while debugging. The experience of watching the model query your actual data and reason about it directly is the fastest way to understand why MCP is worth the setup.
If you’re building a more complete agent loop and want to understand how tool calls fit into the orchestration model, Build Your First AI Agent in TypeScript covers the execution model from scratch.